Announcements|Features|How to|Leagues & Associations
How to Successfully Run a Tournament for Your Youth Sports Organization with TeamLinkt
Created by
Tammi Maharaj
•
Oct 4, 2023
•
5
min read
Announcements|Features|How to|Leagues & Associations
How to Successfully Run a Tournament for Your Youth Sports Organization with TeamLinkt
Created by
Tammi Maharaj
•
Oct 4, 2023
•
5
min read
Content
Organizing a successful youth sports tournament can be a challenging task. Youth sports administrators working behind the scenes put in a lot of time, effort into the tournament to make it a success. A well-run tournament can provide positive experiences for the young athletes and their families. Generally, your youth sports organization should follow these tips: start early, create a comprehensive plan, find the right facility(s), engage your community and provide quality communication. Whether you are a first-time organizer or an experienced one, here are some essential tools and tips on how to successfully run a tournament for your youth sports organization with TeamLinkt.
TeamLinkt's tournaments section is a great way to power registration and scheduling for your tournament. In addition, each team has free access to TeamLinkt's team management app for the tournament, as well as the rest of their season!
TeamLinkt's Tournament Management for Youth Sports Organizations Key Features:
• Collect payments and information from tournament registrants.
• Participants can register directly into the correct division or as an individual.
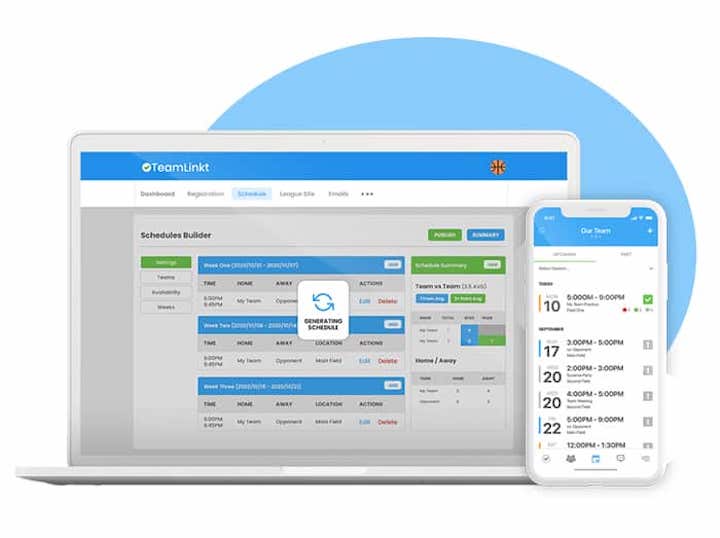
• Use TeamLinkt’s schedule builder tool to easily create a schedule.
• Pool Play or Bracket Scheduling Options Available.
• We automatically build a landing page for your tournament that can be further customized.
• Preview your schedule before you go live!
• Team management app available for FREE to all tournament participants.
• Message and communicate with tournament participants through the free team app.
Follow these Steps to Successfully Run A Youth Sports Tournament with TeamLinkt:
TeamLinkt's Tournament Management for Youth Sports Organizations Key Features:
• Collect payments and information from tournament registrants.
• Participants can register directly into the correct division or as an individual.
• Use TeamLinkt’s schedule builder tool to easily create a schedule.
• Pool Play or Bracket Scheduling Options Available.
• We automatically build a landing page for your tournament that can be further customized.
• Preview your schedule before you go live!
• Team management app available for FREE to all tournament participants.
• Message and communicate with tournament participants through the free team app.
Follow these Steps to Successfully Run A Youth Sports Tournament with TeamLinkt:
1. Create a Season or Use an Existing Season to Run Your Tournament
You will either want to create a new season to run your tournament, or add a tournament to an existing season in your TeamLinkt account.
Scenario 1: For leagues looking to set up a tournament for league playoffs, skip this step and go to step 2.
Scenario 2: If you have teams playing in your tournament from outside of your league or association, you will want to create a new season. Here's how to start a new season:
Click the 'Season' tab at the top
Click the Season dropdown in the far upper right
Click 'New Season' at the bottom of the list
Enter your season details and copy information from a previous season if needed
You will receive an email confirmation once your new season has been created
2. Online Youth Sports Registration
Scenario 1: If you are using tournaments for league playoffs and the teams already exist in your TeamLinkt account, skip this step and go to step 3.
Scenario 2: If you are looking to register teams for your tournament (and accept payment), you will want to create a registration form. A typical scenario for tournaments will be for one person from the team registering (likely a manager or coach) to submit one registration form on behalf of the team. For this scenario, TeamLinkt recommends using 'Must Create A Team'.
**NOTE: if you are having your registrant create a team with their registration form, be sure to set up your league's divisions prior to making the form live. Click here for instructions on setting up divisions.
3. Choosing a Tournament Format
Once all of your teams participating in your tournament are in your TeamLinkt account (either from being created with Online Registration or created manually) you are ready to schedule. There are 3 different options for the format of your tournament's schedule to successfully run a tournament for your youth sports organization with TeamLinkt:
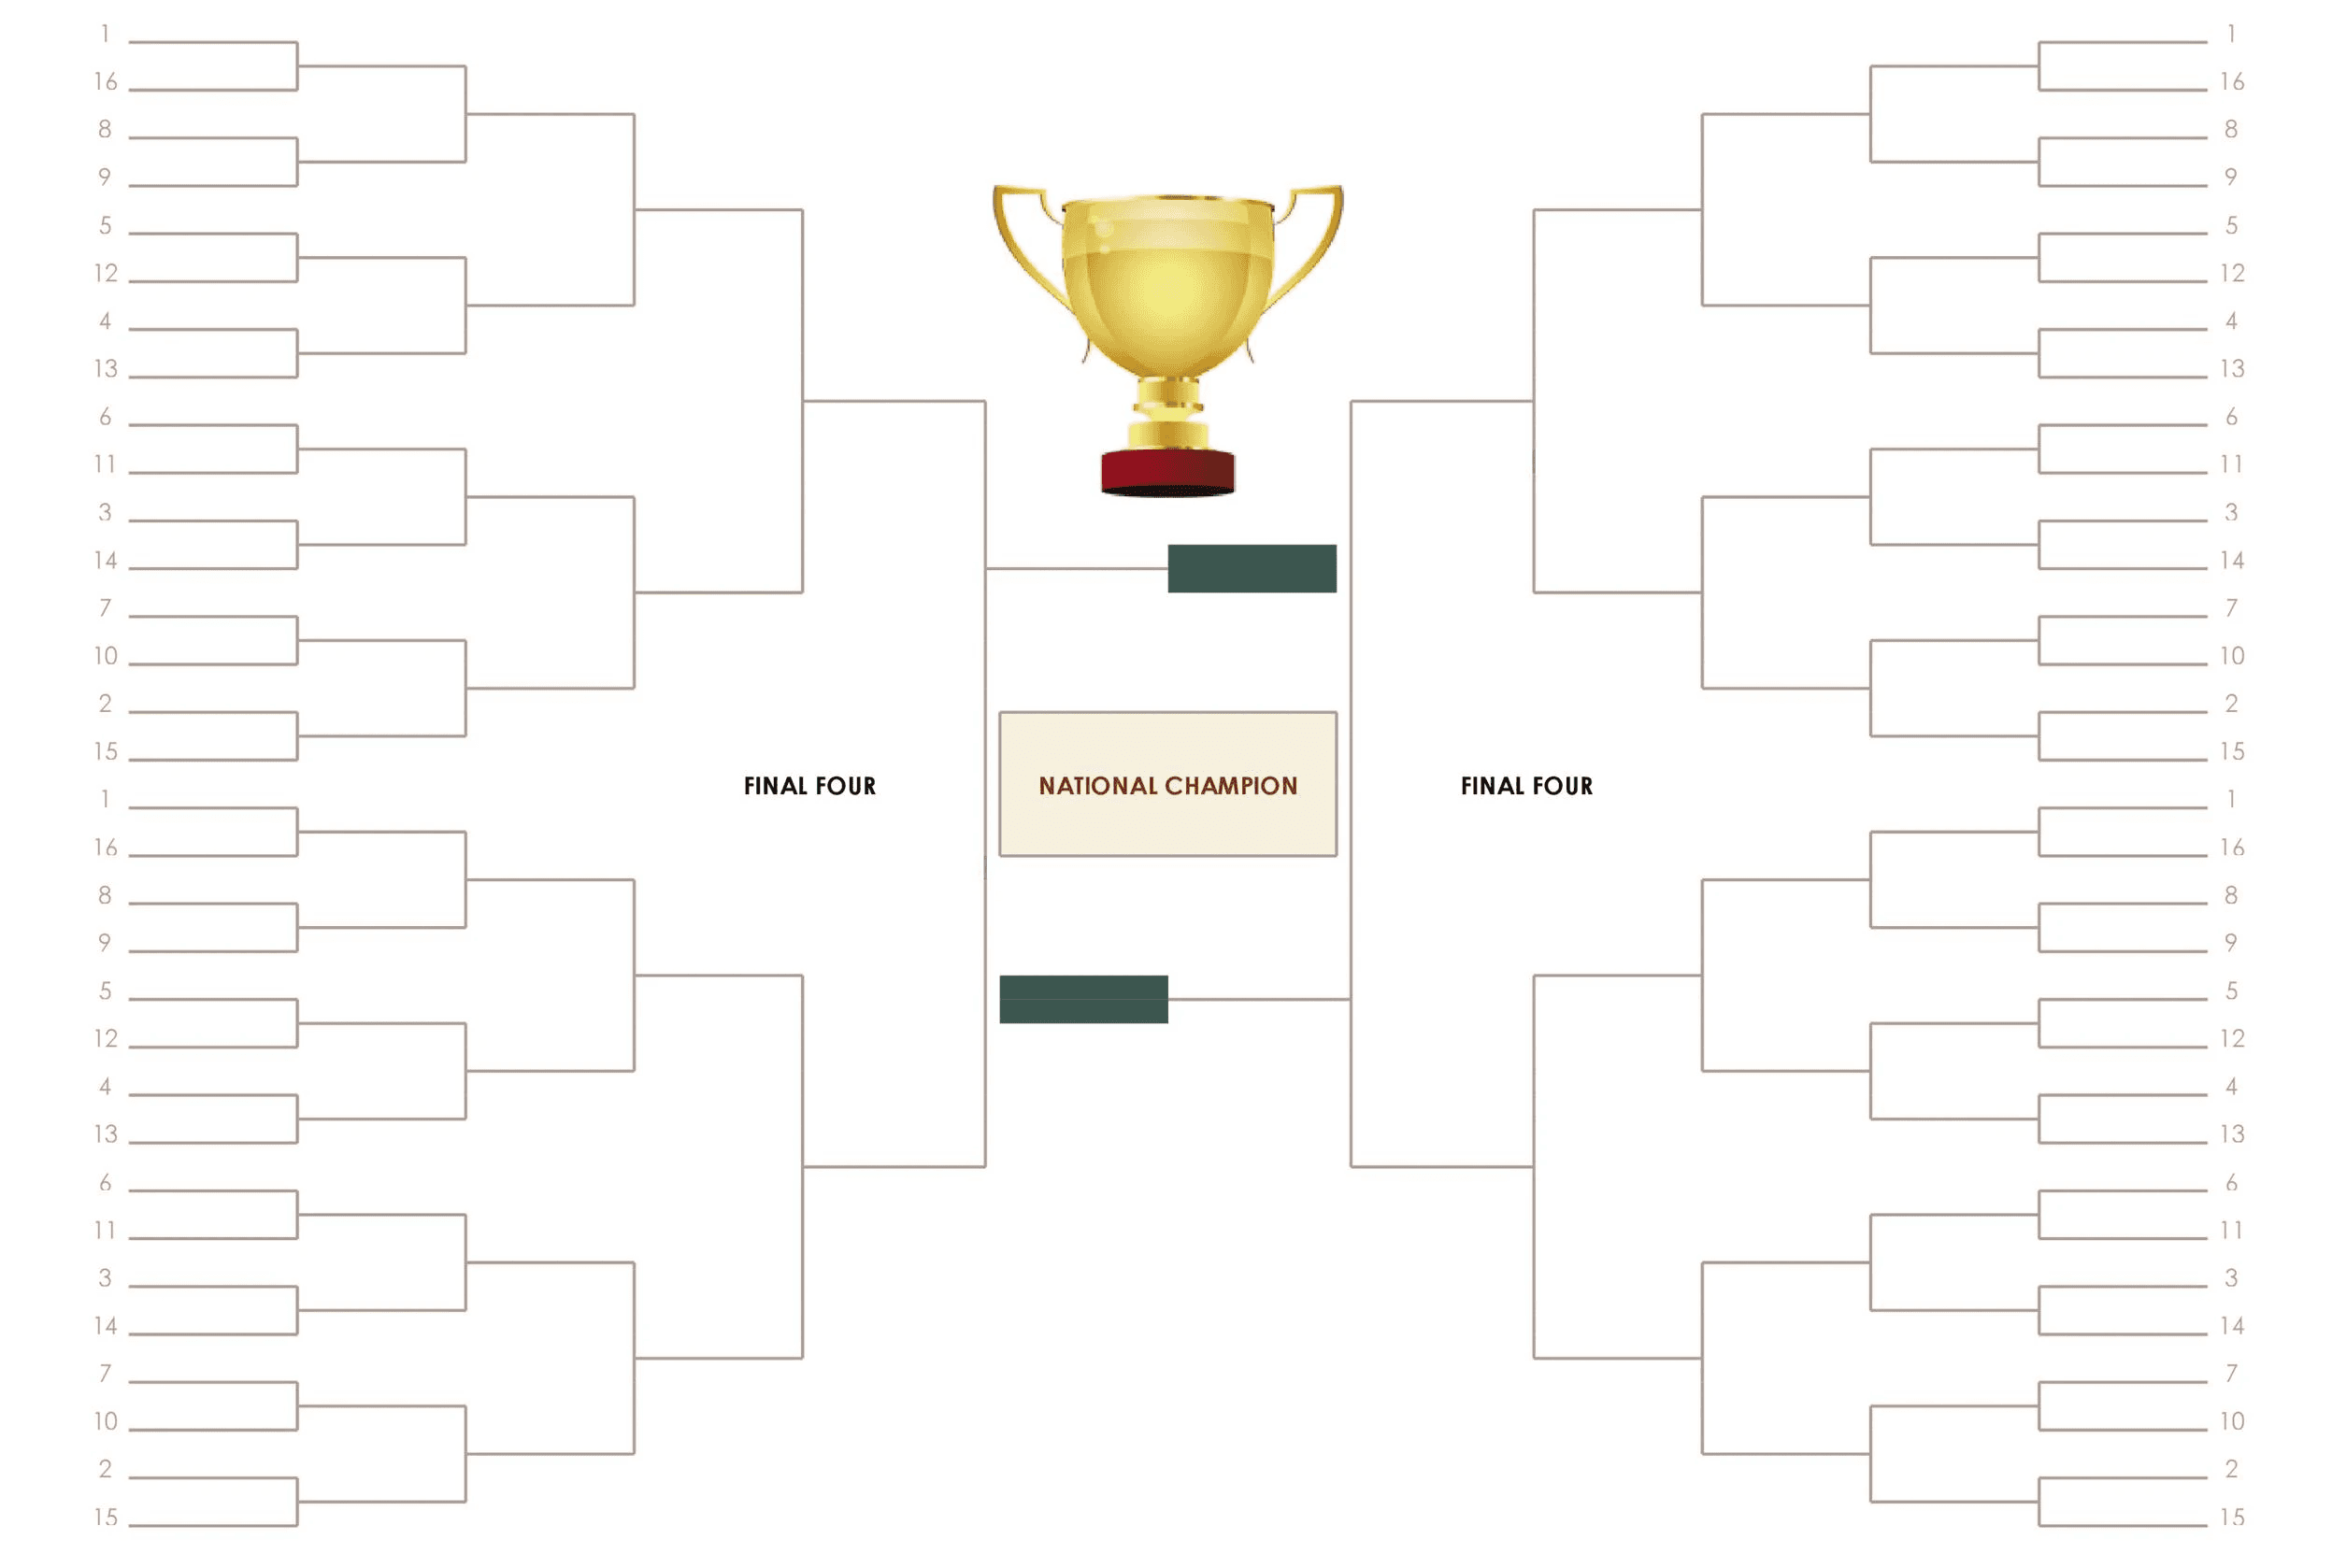
Bracket Only: Teams will be arranged in a bracket format for your tournament. You can customize this to single knockout, series, etc.. Click HERE for more information:
Pool Only: Teams will be assigned to a pool format for your tournament. This is for users looking to do a round-robin style tournament.
Pools and Bracket: Teams will be assigned to a pool format, then later assigned to a bracket. This is for tournaments looking to have a round-robin style tournament, then later place teams into a bracket based on their results.
3. Choosing a Tournament Format
Once all of your teams participating in your tournament are in your TeamLinkt account (either from being created with Online Registration or created manually) you are ready to schedule. There are 3 different options for the format of your tournament's schedule to successfully run a tournament for your youth sports organization with TeamLinkt:
Bracket Only: Teams will be arranged in a bracket format for your tournament. You can customize this to single knockout, series, etc.. Click HERE for more information:
Pool Only: Teams will be assigned to a pool format for your tournament. This is for users looking to do a round-robin style tournament.
Pools and Bracket: Teams will be assigned to a pool format, then later assigned to a bracket. This is for tournaments looking to have a round-robin style tournament, then later place teams into a bracket based on their results.
4. Customize Your Tournament's Youth Sports Organizations Webpage in TeamLinkt
For each tournament, TeamLinkt automatically generates a webpage that you can share with all participants of the tournament. You will be able to view the tournament schedule here (as well as on the free team management app) and share important details.
For steps how to customize your tournament's webpage, click here.
Follow these instructions to update the colours and logos on the webpage.
From there, click 'Website Details' and fill in all necessary details for your tournament. These will all appear on your tournament's webpage.
When you're done, click 'Save'. If you refresh your tournament's webpage, you will see the new details added.
5. Successfully Create a Tournament Schedule (Bracket Only)
Go to Schedule & Scores > Tournaments
• Create a New Tournament
• Enter in the tournament details, select the Format as 'Bracket Only' and click Create In addition, if you click on the 'Preview Website' button, you will see what your auto-generated tournament webpage will look like. For steps on how to customize this webpage (colours, logo, details, etc), click here.
• Next, you will need to go to 'Settings' and set the Game Duration & time between games. **When you're done, click 'Save & Rebuild Bracket'.
• Go to the Teams tab and select all of the teams playing in this tournament. NOTE: You will typically need to create one tournament per division.
• Next, click the 'Settings' tab. **Make sure you have the correct number of teams, start date, end date, Name, consolation round (if needed) and round frequency.
• Customize the series to be single game or best of X games or total points.
• Click 'Edit' on each Series and set all the details for the series. This will include the two teams playing, as well as the details for each game (Home/Away team, time, location, etc. You will want to do this for every Series on the left hand column of your bracket.
This will include the two teams playing, as well as the details for each game (Home/Away team, time, location, etc. You will want to do this for every Series on the left hand column of your bracket.
Once your initial games are set, click 'Publish Schedule'. TeamLinkt recommends sharing the link to the tournament with any coaches, participants or on social media.
When you're done, click 'Save & Rebuild Tournament'.
**Click here to learn more about how to update scores after publishing your tournament: https://help.teamlinkt.com/en/articles/4938704-update-tournament-scores
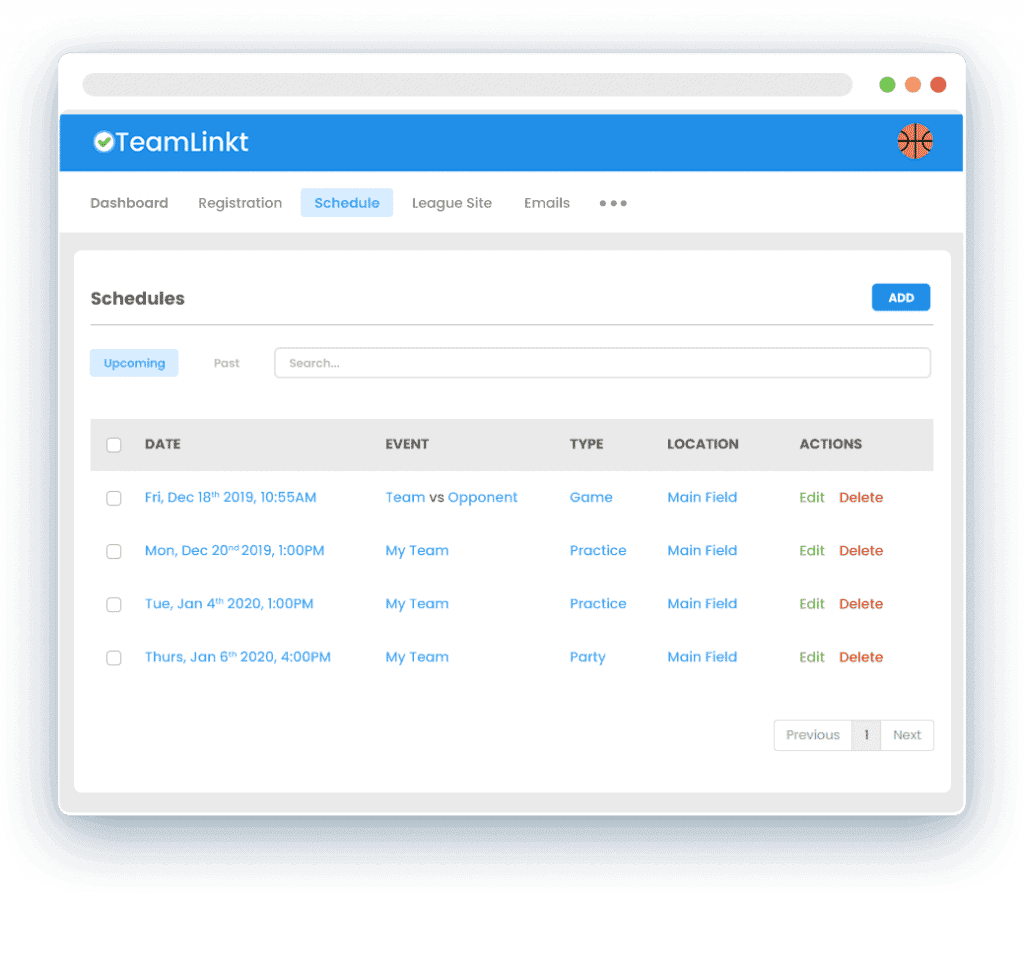
6. Publish Your Organization's Tournament
Once your schedule has been created, publish your tournament & share the link to your tournament's webpage and with participants.
Update Sports Scores for Your Youth Sports Organization Tournament
1. Once your tournament has been published, you can update the scores for games.
2. Open up your tournament and go to the games tab
3. Click 'Set Score' in the Actions column for each game
4. Update the score for the game and make sure the status is 'Completed'. Hit Save when you're done!
You will see the game score update on the games list, and the bracket will update. These changes will be reflected on your tournament's webpage.
Conclusion
Organizing a youth sports tournament can be time-consuming, but it can also be a rewarding experience that brings communities and athletes together. By starting early, creating a comprehensive plan, finding the right facility, engaging the community and providing quality communication, you will achieve better results. Applying these tips on how to successfully run a tournament for your youth sports organization with TeamLinkt, will help you run a successful youth sports tournament and achieve a positive experience for all participants!
Get Started With TeamLinkt Today
Switch to TeamLinkt for free, and transform the way you manage sports.
Get Started With TeamLinkt Today
Switch to TeamLinkt for free, and transform the way you manage sports.
Sports
Features
Solutions
Compare
Company
All rights reserved by TeamLinkt Inc.
Copyright © 2024
Sports
Features
Solutions
Compare
Company
All rights reserved by TeamLinkt Inc.
Copyright © 2024